How to Solve a Rubik’s Cube: So Easy a 3 Year Old Can Do It! Easy Beginner Step by Step Tutorial

You can help support the creation of content, tutorials & projects with a small donation via Paypal and by using affiliate links on Shop Pages.
Thanks for your support!
3 Year Old Beginner Method to Solve the Rubik’s Cube 3×3 Tutorial.
This is our version that combines standard Beginner and Intermediate Layer by Layer Methods of solving the Rubik’s Cube made easier by utilizing critical thinking and intuition in place of following long chains of sequences, very little memorization is necessary.
In this video tutorial we will learn an easy beginner method to solve the Rubik’s Cube in 7 easy steps.
This is the same method that Emily used to solve the Rubik’s Cube when she was 3 years old (video).
For lack of a better name we will call this the “3 Year Old Beginner Method”
3yo Beginner Method for short. #3yoBeginnerMethod
How To Solve Rubik’s Cube Step by Step Instructional Video Tutorial with Full Explanation.
Once you have watched the Full Rubik’s Tutorial and are familiar with Rubik’s Cube basics & cube notation, for a reference see our shortened RECAP Rubik’s video focusing on the 7 Easy Steps to Solve a Rubik’s Cube.
https://www.youtube.com/user/KGittemeier
Subscribe to our Youtube Channel: http://goo.gl/DDfVab
Also check out the 2×2 Tutorial. Separate web post about Rubik’s 2×2 coming soon.
How To Solve 2×2 Rubik’s Cube: So Easy A 3 Year Old Can Do It:
2×2 Cube Intermediate Method https://youtu.be/fDfpjC-GPBM
The Rubik’s Cube instructions below are meant as a supplement and reference for the tutorial video above. Without watching the video the instructions may be difficult to follow at some points. (I plan to update so this post can stand alone as instructions but will take some time due to graphics or photos needed)
I believe this is the easiest method to learn to solve the Rubik’s Cube because it focuses primarily on understanding the Rubik’s Cube, how it works and what is necessary to solve it with very little memorization, only a few easy algorithms.
Website of the iconic Rubik’s Cube: https://www.rubiks.com
Thanks to the following companies for donations towards this project:
The Cubicle
https://thecubicle.us
MoFang MF3RS2 Speed Cube:
https://www.thecubicle.com/products/mofang-jiaoshi-mf3rs2
GAN Cube
https://www.gancube.com
Gan Magnetic Speed Cube:
https://shop.gancube.com/product/ganinfinity-354m
Magnetic Cube
https://magneticcube.com
Blue Translucent Magnetic Dice Cube:
https://magneticcube.com/home/olie-atz2q8
Understanding the Rubik’s Cube
First, we need to understand that the Rubik’s Cube has 6 sides of different colors determined by the Center pieces. For the most part the colors are standardized* and will match from Cube to Cube with the Yellow opposite White, Blue opposite Green and Red opposite Orange. This is important for familiarity and recognition.
The Edges & Corners can be manipulated and moved but the Centers cannot, they can only rotate.

Classic Rubik’s Cube 3×3
Below is a layout view of the standard Western Color Scheme for 3×3 Cubes

Rubik’s Cube Standard Wester Color Scheme
For illustrative purposes, I will use 3×3 Cubes with some of the stickers removed for step by step instructions.

Solve Rubik’s Cube in 7 Easy Steps Tutorial
Here we have the Centers & Core of a disassembled Rubik’s Cube along with the Edge and Corner Pieces.

Rubik’s Cube Core Center, Edge and Corner Pieces
So the trick is to place the Edges & Corners in position relative to the Centers.
The Centers have only 1 sticker or color.
The Edges have 2 colors & the Corners have 3 colors.
–
–
Solving the Rubik’s Cube With the Layer by Layer Method
To solve the Rubik’s Cube we are going to use the Layer by Layer Method.
For simplicity and familiarity we will always use Yellow for the Top Color which will make the Bottom White.
First we solve the First Layer, the Bottom Layer. Notice this isn’t just one side but an entire Face and the 4 sides of the Layer corresponding to the Centers.

Next, we solve the Second Layer, the Middle Layer which is really just inserting 4 Edges, since the Centers are stationary.

Then we solve the Last Layer the Top Layer.

Rubik’s Cube Terminology and Notation
Before we begin we need to learn Cube terminology and notation.
Faces
Each of the six sides has a name.
Whichever side is facing you is the Front with the other sides relative to it.
From here we have the Right, Left, & Back.
The top is called Up and the bottom Down.

A CW and CCW turn is always as if facing the side being turned.
A CCW turn is called Prime or Inverted but you may hear us call it “back,” as that made more sense to a 3-year-old than the words Prime or Inverted. Be careful not to confuse this with the Back side of the cube.
CCW can be represented with an apostrophe ( ‘ ) or an ( i ) for inverted.
Notation of Turns
R = clockwise turn of the Right side.
R’ = counterclockwise turn.
L = clockwise turn of the Left side.
L’ = counterclockwise turn.
U = clockwise turn of the Up or top side.
U’ = counterclockwise turn.
D = clockwise turn of the Down or bottom side.
D’ = counter clockwise turn.
B = clockwise turn of the Back side while facing it.
B’ = counterclockwise turn.

2 means turn twice CW or CCW, whichever you prefer. This is a 180 turn, so direction doesn’t matter.
Therefore R2 means turn the Right side twice.
A lower case letter means we turn that side and the Center layer with it, whether it be the Right, Left, Front, Back, Up, or Down.

Double Layer Turn
Axis Rotations
Now we have Axis rotations of the entire Cube, meaning you rotate the entire Cube in your hands to change which side is facing you.
An x rotation turns the Bottom towards you and it now becomes the Front.
An x’ rotation turns the Top towards you and it now becomes the Front.
A y rotation turns the Right side towards you as it becomes the Front.
A y’ rotation turns the Left side towards you as it now becomes the Front.

X Y Z Axis Rotations of the Cube
Don’t get too hung up on this notation though as most of what we are going to do is visual and intuitive, with very little memorizing.
To solve the Cube we have to pick a color to make the Bottom. Beginners should always use the same color for simplicity and familiarity.
We will use White as the Bottom, which will make Yellow the Top.
–
–
Now to solve the cube:
LAYER 1
-
White Cross
Slap
We must first form a White Cross on the Bottom by placing the 4 White Edge pieces in the Bottom Layer with the adjacent Edge stickers matching their Centers.
The beginner method to do this is to first place the White Edge pieces on Top with the Yellow Center. This may take 1 turn or 2.

Then turn the Up Layer to orient the Edges one at a time so that the adjacent sticker matches the side Center, then spin it down to the Bottom Layer (R2) slap the side.

-
Corners
Slap the White
Once we have the White Cross on Bottom we now need only the four Corners to finish the First Layer.
To do this, we find a Corner on the Top Layer with a White sticker facing to the side (not facing up), then place it above the intended location. If we have a Corner with Red/Green in needs to go between the Red & Green Centers. A quick shortcut is to notice the color adjacent to the White sticker and place it touching its colors Center.
We want to insert this into the corner without knocking out our Bottom Layer Edge piece (show knock out). An easy way to do that is if the White sticker is on the Right side perform R U R’ to insert the Corner. (Slap the white)
If it’s on the Left perform (L’ U’ L) (kick the same piece out insert left)
It’s not important to try to memorize this. The first 2 Layers are visual and only require understanding, critical thinking and practice. If you make a mistake inserting a Corner it will be obvious and easy to correct. Soon you will be inserting Corners and Edges intuitively, without thought.

If the White Corner sticker is on top, bring it down from the top to the side then insert as before using (R U2 R’ U’) insert (R U R’) or (L’ U2 L U) insert (L’ U’ L)
If a White Corner is already in the Bottom Layer but incorrect, just kick it out however you like with something like (R U R’ or R U’ R’) and then insert Corner in the correct location.
Remember, don’t get hung up on notations and following directions, just think about what you’re trying to do and find a way to do it logically.
LAYER 2
Special Rabbits
In order to solve the Second Layer, we need to locate and place the 4 Middle Layer Edge pieces relative to their corresponding Centers.
First, we look on the Top for an Edge that does not have a Yellow sticker. Yellow is the Top color so no Middle Layer Edges can have a Yellow.
Once you have located an Edge, notice the color on the side (not on the Top Face of the Edge piece) and turn the Top so that color rests above the same color Center. This is Blue (or any color) so we turn the top so the edge is over the Blue (same color) Center.

Edge Blue side color above Blue Center color
Now notice its intended location, we need to place it here without disturbing the First Layer.
(Show disturbing the first layer in video) Insert pic here.
So, what we want to do is remove this Corner, pair it up with this Edge, and reinsert them together like this (show corner solved same cube) insert pic here .
One simple way to do this is to look at the Top sticker of this Edge piece and turn the Top 1 turn away from that color’s Center so that it is on the opposite side from that Center color.
(insert picture)
Now take the Corner piece beneath where the Edge piece goes and move it up and towards the Edge piece, chase it (R U R’) then put the corner over the empty spot (U’) and solve as you normally would for the Corner piece (Slap the White Side).
The entire sequence is (R U R’ U’ y L’ U’ L).
We call this sequence “Special Rabbit” because you kick out the Corner, chase the Edge, but the Edge ran away because its a Special Rabbit. So we go back to the starting point. How do you catch a special rabbit? Unique up on it… pairing the Edge and Corner before reinserting both.
Now if the Edge piece is on the other side we do the same only using the Left side this time (L’ U’ L U y’ R U R’).
Be sure to notice, as we solve this Corner it connects with the Edge piece.
Make sure you actually see and understand this and don’t just follow a sequence of instructions, noticing only the result.
If an Edge is already in the Second Layer but in the wrong location or reversed, just kick it out (R U R’ U’) and re-insert the Corner (x L’ U’ L), now find the Edge piece on Top and solve it.

Again, it’s not important to memorize the turns but rather understand the principal of connecting the Corners and Edges before reinserting them. Try to understand what it is we are doing in this step… we are catching Special Rabbits.
–
–
LAST LAYER
Now for the Last Layer we will have to memorize some Algorithms. The more you know, the faster you will solve the Cube, but to start with we are only going to use a few. We will go over more in Part 2 “How to Solve a Rubik’s Cube So easy… Intermediate Method”.
-
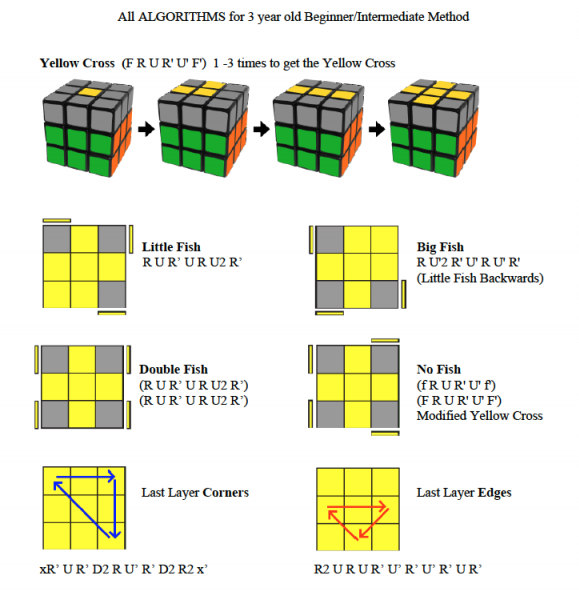
Yellow Cross
Line/12-9
The first step to solving the Last Layer is to place the 4 Yellow Edges on Top forming the Yellow Cross.

Yellow Cross on Top
To do this we perform one easy Algorithm (F R U R’ U’ F’) 1 – 3 times depending on the situation.

Possible stages to Yellow Cross
If we have 2 Yellow Edges forming a horizontal Line on Top we only need to perform the Algorithm once. Disregard any Corner Yellow pieces for these steps, we are only looking for Yellow Edge piece positions.


F R U R’ U’ F’ one time
If we have 2 Edges in the 12 o’clock 9 o’clock positions we do the Algorithm twice. 12-9 can also be considered a backwards L. Clocks hands may be a difficult concept for a child if you only have digital clocks. At 3 years old, Emily just knew the orientation as 12-9 and had no idea what 12 o’clock 9 o’clock meant.

F R U R’ U’ F’ two times
If we have no Yellow Edges on Top we will have to do the Algorithm 3 times.

F R U R’ U’ F’ three times
Download Yellow Cross PDF here: Rubik’s Cube 3yo Slap Method Beginner Algorithms
-
Orient Last Layer OLL
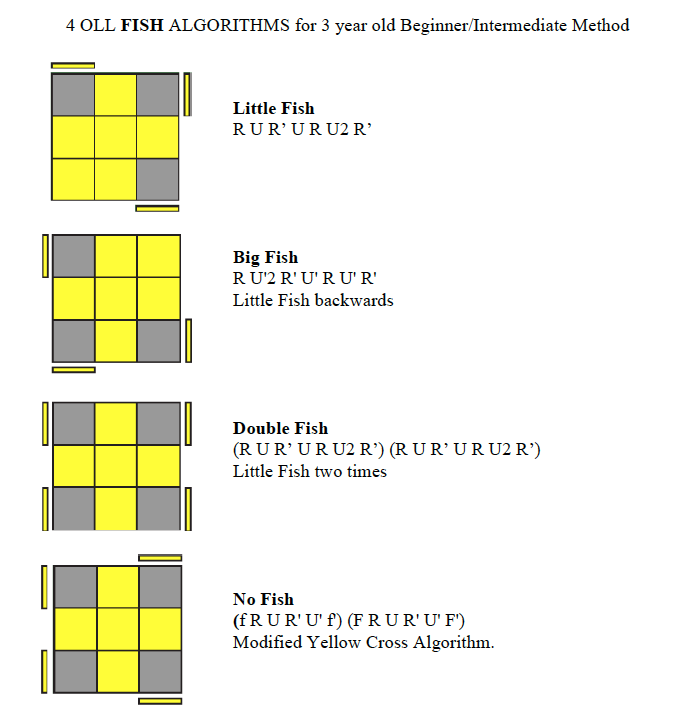
Fish
Now, we must orient all the Corner pieces so that the Yellow sticker is on top. This is called Orient Last Layer, OLL.

All Yellows on Top / OLL
Once you have the Yellow Cross there can only be 7 possible arrangements, each with its own Algorithm to get all the Yellows on Top.
We are only going to use two Algorithms: 1 forward and backward, and 1 variation of another we already learned (Line 12-9).
– Fish Patterns
We start with the Fish patterns, which get their name because someone thought this looked like fish.
Notice that, although these 2 patterns look the same from the Top, they are different because of the way the Yellow stickers are oriented on the sides.

Little Fish in on Left / Right is Big Fish
My children called this first one Little Fish and the other Big Fish for no other reason than they like the song “Down by the Water” by PJ Harvey.
To solve Little Fish we hold the Cube so that the Yellow Top Corner sticker is at the Front Left side with a Yellow Corner sticker facing us Right Front side and perform (R U R’ U R U2 R’) which places all the Yellows on Top. Performing these simple Algorithms is much easier than it may seem after just a few times practicing it in a row. This is actually the very first step Emily learned when she was 3 and she learned by watching her brothers practice. See video of fish practice here: https://youtu.be/y_uwaxcReEI

Lil Fish R U R’ U R U2 R’
To solve Big Fish we place the Yellow Top Corner sticker at the Back Right side with a Yellow Corner sticker facing us Left Front side and perform the inverse of the Little Fish Algorithm (R U’2 R’ U’ R U’ R’).

Big Fish R U’2 R’ U’ R U’ R’
Once you know an Algorithm well it becomes intuitive to perform it backwards without much thought or effort. Performing the Algorithms forward then reverse is a great way to practice the muscle memory. See our “Beginner Practice Steps & Strategies” video here:
Now we look at two Yellow Crosses with no Corners on Top.
The first, which we call “Double Fish” has 2 Yellows on the Left side and two on the Right.

Double Fish (LF alg twice)
The second which we call “No Fish” has 2 Yellows on the Left side, 1 on the Front Right, and 1 on the Back Right.

No Fish
To solve Double Fish, place the Yellow Corners on the Left and Right sides and perform the Little Fish Algorithm twice (R U R’ U R U2 R’) (R U R’ U R U2 R’).
Now as you can see, you do some unnecessary moves by performing this two full times, namely the R’ R, but as a beginner its best to just do them fully for now.
To Solve No Fish, place the two Yellow Corners that are on the same side to the Left side and perform a slight variation of the “Yellow Cross” Algorithm “Line”: instead of Front Right Up, it’s Double front Right Up (f R U R’ U’ f’), then standard Yellow Cross “Line” Algorithm (F R U R’ U’ F’).
At one time for No Fish we used the Algorithm (R U’2 R2 U’ R2 U’ R2 U’2 R) but we stopped because it takes more moves and it’s one less Algorithm to memorize by ditching it. However, you will see Emily using it in some of her Youtube videos from when she was three.
This allows us to solve 4 of the 7 possible OLL arrangements for the Yellow Cross with only two Algorithms, one of which we already learned and use.
If we get one of the 3 OLLs we haven’t gone over simply perform the Little Fish Algorithm 1 or more times until we get one of the OLL arrangements we are familiar with.


These 3 OLL cases we haven’t learned yet we call Bug Eyes, Chameleon and Chameleon’s Ugly Brother.
We will learn these in our “Intermediate” video once we understand and can solve the cube with beginner method.
Download PDF of Fish OLLs here: 4 Fish Algorithms PDF
-
Permute Last Layer PLL
Now we have our first 2 Layers complete and all the Yellows on Top.
We just need to position the Top correctly relative to the Centers.
We will correct the Corners first then the Edges which will solve the entire Cube.
– Last Layer Corners
A quick and simple short cut to correct the Corners is to find a side that has 2 Corners the same color.

Place these to the Back and perform (x R’ U R’ D2 R U’ R’ D2 R2 x’).
This will move the Corner pieces as seen in diagram below.

x R’ U R’ D2 R U’ R’ D2 R2 x’
If no side has 2 Corners with the same color, just perform the Algorithm once and then one side will, then repeat which will solve all the Corners.
Now, turn the Top to line up the Corners with their respective Centers.

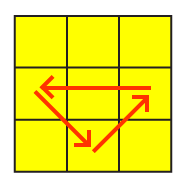
– Last Layer Edges
We will now have 3 or all 4 Top Edges out of place.
We are looking for 3 Edges out of place and one solved side placed to the Back.

R2 U R U R’ U’ R’ U’ R’ U R’
If the Edge piece on the Left side needs to move to the Right side we perform the following Algorithm once (R2 U R U R’ U’ R’ U’ R’ U R’). Emily voice “So… this one goes here, I do it once”
It the Left side Edge piece needs to move to the Front side rather than the Right side we perform the Algorithm twice.
If all 4 Edges are wrong, perform the Algorithm then place the solved side to the Back and perform 1-2 more times.
Congratulations! The Rubik’s Cube is now Solved.
Emily at 3 years old “I’m done solving the whole thing”
Me “Wow Emmy thats pretty good”
While this may seem difficult at first, with a little practice it becomes quite easy. We learned the principle by which we plan to solve the cube and we only had to memorize a few easy Algorithms, the rest is just patience and practice. With this method my children were able to solve the Rubik’s Cube in less than 1 minute. Emily in as little as 42 seconds.
Rubik’s Algorithms
Yellow Cross
Line
– F R U R’ U’ F’
OLLs
Little Fish
– R U R’ U R U2 R’
Big Fish (LF Backwards)
– R U’2 R’ U’ R U’ R’
Double Fish (LF twice)
– (R U R’ U R U2 R’) (R U R’ U R U2 R)
No Fish
– (f R U R’ U’ f’) (F R U R’ U’ F’)
Last layer Corners
– x R’ U R’ D2 R U’ R’ D2 R2 x’
Last layer 3 Edges
– R2 U R U R’ U’ R’ U’ R’ U R’
General Notes:
Insert First Layer Corner
White sticker on Right: R U R’
White sticker on Left: L’ U’ L
(Slap the White side)
Second Layer Edges
Align Edge to Center
Move it away
Remove Corner (kick out)
& Chase the Edge (chase Rabbit)
Pair Edge & Corner (Unique Up on it)
Re-Insert Corner (Slap the White side)
Second Layer Edges
If an Edge is in wrong
Kick it out (put another in)
Re-insert Corner
Find Edge then insert
Last Layer Yellow Cross
F R U R’ U’ F’
Repeat 1 – 3 Times
Until Yellow Cross
Rubik’s Cube 3yo Slap Method Algorithms PDF download
Rubik’s Cube OLL Fish Algorithms PDF download
Edit 2022_02_03 Intermediate Method algs
I have added a few “Intermediate Method” algorithms that have been heavily requested since I have yet to make the “Intermediate Method” video and web post. Sorry for the delay but it is on the to do list.
I recommend only using these algorithms after you have become proficient at the beginner method taught above and in the video.
Double Fish (more efficient method)
(R U R’ U R) U’ (R’ U R U2 R’)
Bug Eyes
(R2’ D) (R’ U2) (R D’) (R’ U2 R’)
Note “l” is lower case “L” not capital i.
Rewatch Terminology & Notation if needed 5:35
Chameleon
(l’ U’) (L U) (R U’) (r’ F)
Or
(l’ U’) (L U) (R U’) (L’ U) x’
Note that (L’ U) x’ is = to (r’ F) due to relative position (Einstein was correct)
Chameleon’s Ugly Brother
(l’ U’) (L’ U) (R U’) (L U) x’
Last Layer Corners no 2 Corners matching on the same side.
Perform Cams Ugly Brother then Cam to fix all corners.
Last Layer Edges CCW is just the mirror alg (from opposite side) LL Edges CW (Beginner Method)
(L2’ U’) (L’ U’) (L U) (L U) (L U’ L)
Last Layer Edges 4 wrong opposite of each other:
M = Middle Slice (M2 = r2 R2)
(M2 U) (M2 U2) (M2 U M2)
Diagrams and PDFs (along with full tutorial) to come soon.
The term “soon” is relative though, my soon may not be equal to your soon.
Rubik’s Cube Color Schemes
* The two primary Twisty Cube Color Schemes are:
Western Color Scheme as described in our tutorial
&
Japanese Color Scheme – White opposite Blue, Red opposite Orange, Green opposite Yellow.
I have only seen this in pictures as I live in the USA.
How To Solve Rubik’s Cube RECAP Video of 7 Easy Steps to Solve Rubik’s Cube
Video of Emily solving the Rubik’s Cube her second time ever.
We didn’t know she could solve it so once she solved it we got the camcorder and recorded the second solve.
We didn’t think is was possible for her to solve the Rubik’s Cube at such a young age but she learned the FISH algorithms so easily and wanted to solve it so she practiced the steps for weeks before putting all the steps together and solved the whole thing. Now we realize anyone can solve the Rubik’s Cube with this easy step by step full tutorial.
2008 Video of 3 Year Old Emily Gittemeier solving the Rubik’s Cube 3x3x3
–
–
2008 Video of 3 Year Old Emily Gittemeier Solving the Rubik’s Cube 2x2x2 and getting a lucky skip.
Kids practicing Rubik’s Cube Youtube Playlist: https://youtu.be/DUdq2vqybpU
See our “3 year old Intermediate Method” video coming soon.
A few weeks after solving with our beginner method Emily learned more intermediate methods including.
- White Cross intermediate method.
- “12/9” algorithm in addition to “Line” alg.
- All 7 OLL algorithms from Yellow Cross.
- One additional Last Layer Edges algorithm.
- One addition Last Layer Corners algorithm.
All of which were easy and fun Algorithms to learn but really should only be learned after fully understanding the Cube and being able to solve it easily with the Layer by Layer Beginner Method to solve the Rubik’s Cube.
Intermediate Method will discuss Slice Turns M E S and go over some patterns.
Check out this awesome Magnetic Dice Cube Video
3x3x3 Blue Translucent as seen in the Video: https://magneticcube.com/home/olie-atz2q8
Sub 1 minute example solves with this 3yo Beginner Method (Magnetic Speed Cube)
–
Solve Rubik’s Cube in less than a minute with easy 3yo Beginner Method (Budget Speed Cube)
–
–
–
–
In this Easy Rubik’s Cube Solving for Kids video Tutorial and step by step Rubik’s instruction we saw a simple easy to follow Kids Guide to Solving the Rubik’s Cube. This is a How to Solve Rubik’s Cube Easy for Kids Tutorial or Rubik’s Cube for Beginners Guide that anyone can use to solve the cube as a brain exercise for children. We learned How to the Solve Rubik’s Cube with Pictures to follow along with step by step instructions and the How to Solve Rubik’s Cube Video tutorial to see how to solve the speed cube along with Rubik’s Algorithm PDF Downloads. Anyone can solve the Rubik’s Cube which means you can solve the rubix cube with this Rubiks step by step tutorial.
Also see our 2×2 Cube Intermediate Method Tutorial: 2×2 IM

–
–
–
See our latest Tutorials
Rubik’s Puzzle Tutorial Videos:
Learn How to Fail Properly: https://youtu.be/NRWG0MfrAXg
Rubik’s Cube 2×2 Beginner Method: https://youtu.be/UYCeyu_pbTI
Rubik’s Cube 2×2 Intermediate Method: https://youtu.be/fDfpjC-GPBM
Rubik’s Cube 2×2 Ortega Method: https://youtu.be/dZFXDVYft04
Rubik’s Cube 3×3 Beginner Method: https://youtu.be/9spDGBeWl1o
Rubik’s Cube 3×3 Intermediate Method:
Rubik’s Cube 3×3 Intuitive F2L:
Rubik’s Cube 4×4 Beginner Method: https://youtu.be/3U-HWJaHHwQ
Rubik’s cube 4×4 L2C: https://youtu.be/gnBcpUzRrJU
Rubik’s Cube 4×4 L2E: https://youtu.be/ZPwSy8PweDM
Rubik’s Cube 4×4 OLL Parity: https://youtu.be/mkwJRgwy4R4
Rubik’s Cube 4×4 PLL Parity: https://youtu.be/1Vj6gy_8-u8
Rubik’s Cube 5×5 Beginner Method:
Rubik’s cube 5×5 L2C:
Rubik’s Cube 5×5 L2E:
Rubik’s Cube 5×5 Parity:
Pyraminx Beginner Method: https://youtu.be/gKbJOAeEkNI
Pyraminx Intermediate Method: https://youtu.be/Jl-DhDrWWNE
Skewb Beginner Method: https://youtu.be/_JaS0XB2xw4
Megaminx Beginner Method: https://youtu.be/iAf8zbq0HH8
Megaminx Intermediat Method:
Megaminx LL Beginner Method: https://youtu.be/s1FNwfFdrTM
Megaminx LL Intermediate Method:
You can help support the creation of content, tutorials & projects with a small donation via Paypal and/or by using affiliate links on Shop Pages. Also subscribing to my YouTube Channel helps a ton!
Thanks for your support!
I’m glad it was helpful, we’ve been meaning to make this “How To” video since we first posted this video 11 years ago:
https://youtu.be/DUdq2vqybpU
We procrastinate!
Thanks for the information!
Glad it was helpful, we’ve been meaning to make this “How To” video since we first posted this video over 11 years ago:
“3 Year Old Solve Rubik’s Cube (Emily Gittemeier)” https://youtu.be/DUdq2vqybpU
So easy!
A 3 year old can do it?
3 year old solves Rubik’s Cube: https://youtu.be/DUdq2vqybpU
3 Year Old Solves Rubik’s Cube 2×2 in 15 seconds: https://youtu.be/6Hs6800jW_w
😁
That’s cap
Kevin, I am having a problrm with setting the corners. The algorythm is leaving me one corner completly out of place. I have repeated it several times and I cannot get the corners to come out correctly.
Thanks so much for posting!!
This is great!!
Juan
Is there a step or rotation that I am not performing correctly?
Thanks!!
Juan Cotto Seattle WA
That is mathematically impossible so you must have a corner twisted or the cube was disassemble and reassemble incorrectly (dropped perhaps).
Just go ahead and twist the corner or disassemble the cube then reassemble it fully solved and practice from there.
I didn’t realize how common that problem was with new speed cubes when I made the tutorial but I do mention it in the later tutorials.
Good luck!
Thank you for this comment, i was about to give up and throw it in the bin!
Glad it helped! When I originally wrote the script for this tutorial (11 years prior to actually making it) speed cubes were not as advanced and it wasn’t common to have a twisted corner. Now it is very common and a cause for much confusion and frustration to people just learning. Eventually I will make a new video tutorial and will make note.
guten tag, bin zufrieden auf diese Seite gestossen und bin begeistert davon aber m er in Englisch ist gleich Null. gibst diese Version auch auf Deutsch, das wäre toll. lg. Schober Heinrich Giacomettistrasse 56 7000 Chur h.schober@bluewin.ch
Now complete:
2×2 Cube Easy Beginner Method Tutorial: https://youtu.be/UYCeyu_pbTI
2×2 Cube Intermediate Method Tutorial: https://youtu.be/fDfpjC-GPBM
Once you have watched the Full Rubik’s Tutorial and are familiar with Rubik’s Cube basics & cube notation, for a reference see our shortened RECAP Rubik’s video focusing on the 7 Easy Steps to Solve a Rubik’s Cube.
https://youtu.be/-LWbfy3AWzw
PDF download of all Algorithms for Beginner Method:
https://www.kevingittemeier.com/wp-content/uploads/2019/01/3-year-old-solves-Rubiks-Cube-Beginner-Algorithms.pdf
PDF download of OLL Fish Algorithms:
https://www.kevingittemeier.com/wp-content/uploads/2019/01/3-year-old-Solves-Rubiks-Cube-OLL-Fish-Algorithms-.pdf
In the No Fish algorithm,
“To Solve No Fish, place the two Yellow Corners that are on the same side to the Left side and perform a slight variation of the “Yellow Cross” Algorithm “Line”: instead of Front Right Up, it’s Double front Right Up (f R U R’ F’ U’ f’), then standard Yellow Cross “Line” Algorithm (F R U R’ U’ F’).”
Could you explain further, and/or give a diagram for what the lower case (f) is in the first half of the algorithm? Thanks!
Yes, a lowercase letter means we turn that side and the center with it. So a lowercase f means we turn the Front and the middle slice with it. I will adjust the web post to better explain this and other parts but it’s covered in the youtube video at the 5:45 mark.
I recommend watching the entire notation section though from 4:14-6:50.
Let me know if the video helped and if you have any further questions.
The web post needs some further work but the video is solid and covers everything pretty well.
Now complete
2×2 Cube Easy Beginner Method Tutorial: https://youtu.be/UYCeyu_pbTI
2×2 Cube Intermediate Method Tutorial: https://youtu.be/fDfpjC-GPBM
FYI I am doing a free Giveaway for a $55.99 Gan Megaminx.
Details on the Meg Tutorial: https://youtu.be/s1FNwfFdrTM
Hi Kevin! Thanks a lot for this great tutorial! I just received a 3×3 cube yesterday and thanks to you, I can solve it under 2 minutes after just one day of practice (intensive day though ;))! I couldn’t believe it!! 🙂 There seems to be one typo mistake: the no fish algorithm you wrote “… (f R U R’ F’ U’ f’)(F R U R’ U’ F’)…” instead of (f R U R’ U’ f’)(F R U R’ U’ F’). Just an extra F’ in the first one.
All the best to you!
Max
ohh good catch thank you.
I proof read but still mistakes because my brain was jello trying to complete this.
I even spelled my last name incorrectly in one of the final titles.
The video I just made “How To Solve 2×2 Rubik’s Cube: So Easy A 3 Year Old Can Do It: https://youtu.be/UYCeyu_pbTI also has a spelling mistake in it that I didn’t notice until afterwards.
Are you located in the US? I may send a free cube for finding the mistake for me.
Thanks again!
You’re very welcome Kevin! Haha yeah, that was a long article, difficult to spot every typos 😉
Thanks a lot for the offer, that’s very kind, but I’m located in France 😉
I have never done a give away before but I am going to try to do one. First USA only but if that goes well I will try to work something out were I can have a cube shipped direct from a seller to someone outside the US. If I can get that worked out I will certainly send you one for finding and bringing this mistake to my attention.
Thanks again.
Just fyi – Tutorials to come:
3×3 Intermediate Method
– Advanced White Cross
– F2L
– All 2 Look OLL PLL
2×2 Intermediate Method
– Full 2 Look OLL PLL
2×2 Advanced Ortega Method made Simple
Pyraminx Beginner & Intermediate Methods
Megaminx Beginner Method
4×4
5×5
* I have a super easy method for the Megaminx with only 2 easy algorithms, one of which we learned on 3×3 (F R U R’ U’ F’)
Also check out:
“How to Solve Rubik’s 2×2 So Easy a 3 Year Old Can Do It: https://youtu.be/UYCeyu_pbTI
FYI I am doing a free Giveaway for a $55.99 Gan Megaminx.
Details on the Meg Tutorial: https://youtu.be/s1FNwfFdrTM
Gan is only willing to donate one at this point but maybe more in the future as I gain more negotiating power with increased subscriber base.
Chance of winning this giveaway is good though bc few have entered.
The Rubik’s cube is actually a 26 pieces puzzle. There are three types of pieces: (see image) Corner piece : has three different color stickers on it (there are 8 corner pieces in the cube) Edge piece : has two different color stickers on it (there are 12 edge pieces in the cube) Center piece : has one color sticker on it (6 center pieces, all are attached to the core) The core is the inside of the Rubik’s Cube, which holds all the pieces together and is attached to the center pieces with rotatable axes. Important! The center pieces are part of the core and subsequently cannot move relatively to each other. For that reason they are already “solved”. The solving process is actually bringing all corner and edge pieces to the “already solved” center pieces (meaning there are only 20 pieces to solve out of the 26). For example, the blue center piece will always be opposite to the green center piece (on a standard color-scheme cube). It doesn’t matter how hard you will try scrambling the cube, it will just stay that way. 30
Good explanation
FYI I am doing a free Giveaway for a $55.99 Gan Megaminx.
Details on the Meg Tutorial: https://youtu.be/s1FNwfFdrTM
Hi
I’m Aishwarya
I was wondering if somebody will explain me about ‘x’
I really did not understand that but I like all the methods you used to solve the cube.
Thank you
I checked out a few beginner 3×3 methods and decided to use yours! You’re a great teacher! I just ordered a 2×2 and am super excited for your other videos coming up. Thanks for doing this!
Thank you, I’m glad it was helpful.
I have the 2×2 Beginner Method posted on Youtube https://youtu.be/UYCeyu_pbTI
Still working on the web post and PDFs.
Tutorials to come:
3×3 Intermediate Method
– Advanced White Cross
– F2L
– All 2 Look OLL PLL
2×2 Intermediate Method
– Full 2 Look OLL PLL
2×2 Advanced Ortega Method made Simple
Pyraminx Beginner & Intermediate Methods
Megaminx Beginner Method
4×4
5×5
* I have a super easy method for the Megaminx with only 2 easy algorithms, one of which we learned on 3×3 (F R U R’ U’ F’)
Now Complete
2×2 Cube Easy Beginner Method Tutorial: https://youtu.be/UYCeyu_pbTI
2×2 Cube Intermediate Method Tutorial: https://youtu.be/fDfpjC-GPBM
Currently working on Megaminx Easy Beginner Tutorial
FYI I am doing a free Giveaway for a $55.99 Gan Megaminx.
Details on the Meg Tutorial: https://youtu.be/s1FNwfFdrTM
3×3 Cube Easy Beginner Method Tutorial: https://youtu.be/9spDGBeWl1o
2×2 Cube Easy Beginner Method Tutorial: https://youtu.be/UYCeyu_pbTI
2×2 Cube Intermediate Method Tutorial: https://youtu.be/fDfpjC-GPBM
Currently working on Megaminx Easiest Beginner Method
https://www.youtube.com/user/KGittemeier
Where are your intermediate and advanced instructions btw. And also thank you for the content so far.
Thanks,
I haven’t made them yet for the 3×3 but I did make a 2×2 Intermediate video which shows all 7 OLLs on both the 2×2 and 3×3. https://youtu.be/fDfpjC-GPBM . Let me know if helpful.
I have many tutorials planned but it will be a while since I am currently dealing with some unexpected home repairs.
Megaminx
Pyraminx,
Skewb,
3×3 Intermediate Method,
3×3 F2L,
2×2 Advanced Ortega,
Most of what’s seen in my videos can be found here:
Amazon: https://www.amazon.com/shop/kevingittemeier
Really helpful!!!
Thanks check out out 2×2 tutorials
How to Solve Rubik’s 2×2 So Easy a 3 Year Old Can Do It: https://youtu.be/UYCeyu_pbTI
How To Solve 2×2 Rubik’s Cube Part 2: Intermediate Method https://youtu.be/fDfpjC-GPBM
and be sure so subscribe to our Youtube channel for all the latest tutorials http://goo.gl/DDfVab
Thank you for this method. I learned from a book 4 years ago how to solve the cube and could regularly complete it in a minute. I gave away the book and then bought myself a new cube for Christmas. But I got stuck after the first layer. I searched and practiced other methods but spent days stuck on the last layer twisting corners. Your method took me back to learning the cube again and in 2 days of practice, I have completed a few under 4 minutes. I’d love to see the other none fish Bug Eyes, Chameleon and Chameleon’s Ugly Brother.
Will you create the “Intermediate” video soon?
I plan on doing it soon but it likely won’t be completed soon. However this video https://youtu.be/fDfpjC-GPBM goes over the other OLLs including Bug Eyes, Cham, Chams bro for both the 2×2 and 3×3.
Let me know if you found it helpful and I will try to get the 3×3 Intermediate out asap.
Be sure to subscribe to you youtube channel for latest tutorials http://goo.gl/DDfVab
FYI I am doing a free Giveaway for a $55.99 Gan Megaminx.
Details on the Meg Tutorial: https://youtu.be/s1FNwfFdrTM
FYI I am doing a free Giveaway for a $55.99 Gan Megaminx.
Details on the Meg Tutorial: https://youtu.be/s1FNwfFdrTM
not helpful at all.in the video your hands move too fast i cannot see
hey i cant seem to get it man!!!!!!!!!!!!!!!!!!!!!!!!!!!!!!!!!!!!!!!!!!!!!!!!!!!!!!!!!all these stupid rubix cube vids
I really did it, can’t wait to internalize it so that I can teach it to my kids, relatives and friends.
Awesome. Check out the other tutorials as well including 2×2, Megaminx, Pyaraminx: https://www.youtube.com/KevinGittemeier
Hi Mr. Kevin,
Could you please provide me the Algorithms for Chameleon, Cams Ugly Brother and Big eyes.
Thanks & Regards
Kenny Dias
Yes, those are covered in my 2×2 / 3×3 Intermediate Method video: https://youtu.be/fDfpjC-GPBM and are also typed out in the video description.
This video covers all 7 OLLs for both 3×3 and 2×2.
Eventually I will make a dedicated Intermediate Method 3×3 Tutorial but I have to find the time.
Hi Kevin – I responded to your video on YouTube as soakingwetcat, and pretty much can solve the cube in 2-4 minutes.
I have a problem. I have a Chameleon, and I’m holding it like the chart says. I perform the algorithm once and I get 3 yellow (backwards L), on the top left 4 squares. That’s where they are supposed to be. I do it again. and I get a yellow line down the center with a yellow line down the right side. Looks good. Do it again and I’m back to Chameleon. I know I can turn the cube and get a different result. What’s your input on how to get out of a Chameleon loop?
BTW – keeping my cube exactly as it is in case you want to see what I’m doing for yourself.
So when you hold Chameleon and perform Little Fish as seen here: https://youtu.be/9spDGBeWl1o?t=1469 do you get Chameleon again but just positioned differently? It should, if not something is wrong. Just perform Little Fish again and then it makes No Fish, then solve No Fish.
Keep in mind I am just demonstrating that you don’t have to remember how to hold each of the other 3 OLLs at first. You can just play with it by using Little Fish which helps you practice the Little Fish algorithm while also get familiar with the Cube.
Once practiced up with the Little Fish algorithm where its second nature and also familiar with all then cases, then you can learn how to hold each of the other 3 OLLs for faster solves, then eventually learn the other 3 OLL algorithms.
If none of that works you may have a twisted corner and its unsolvable. Disassemble it and reassemble correctly then start over solving.
Also listen to this important practice and learning message about success and the necessarily of failure: https://youtu.be/s1FNwfFdrTM?t=137
Let me know
I figured it out Kevin – I was applying the wrong algorithm. I must have been really tired!
Do you have the intermediate method posted somewhere? I noticed you mentioned it.
Thanks again.
It takes time and practice to get familiar with and recognize the cases.
All 7 OLL cases are covered for both the 3×3 and 2×2 Cubes in this video: How To Solve 2×2 Rubik’s Cube Part 2: Intermediate Method https://youtu.be/fDfpjC-GPBM
It is also located at the bottom of this 3×3 post on this page.
Also watch the PSA on Learning, Understanding and the necessity of Failure in this tutorial at 2:17 https://youtu.be/s1FNwfFdrTM?t=135
I’d like to see a photo, maybe tag me on social media or something:
Instagram: https://www.instagram.com/ktfg_9
Facebook Page: https://www.facebook.com/KTFG1
Reddit: https://www.reddit.com/user/KTFG
Pinterest: https://www.pinterest.com/KTFG9
Twitter: https://twitter.com/KTFG9
Really? Is that right? I’ve tried so many times but failed every time. I will follow the steps and see Is they work or not.
Hi Kevin – our family’s really been enjoying watching your videos and learning how to solve the Cube together! On this post, I noticed a couple typos: in both the Lil Fish picture and the Last Layer Edges picture, the caption ends with R but should be R’. Thanks!
Thank you! I just fixed them. If you like I can email you a $10 gift code to SpeedCube Shop for pointing that out to me.
This was helpful, thanks 🙂 I can reliably solve the F2L without having to look at algorithms after practicing your methods. Even though it may take more moves with the axis rotation I found the ‘special rabbit’ way of placing the 2nd layer’s edges more intuitive / easy than the usual U R U’ R’ U’ F’ U F used on most of the other tutorials I’ve looked at. I tried the normal algorithm after learning ‘special rabbit’ and really struggled to get the edges placed using that way. I think there’s already some level of muscle memory ingrained at this stage.
btw, it may help some people to list the entire sequences as (U R U R’ U’ y L’ U’ L) and (U’ L’ U’ L U y’ R U R’) when the center and edge pieces are aligned, so they don’t miss the initial move.
Glad it helped. Thanks for the tip.
Hi there. I love learning new methods and I like the elegance of your tutorial, especially how it easily translates between the 2×2 and 3×3 cubes. I plan to teach my girlfriend’s 6-year-old daughter this technique on her 2×2 I got her, then transition her knowledge to a 3×3 which I will also get her.
I believe you’ve got a typo on the video “2×2 Cube Intermediate Method Tutorial” for the No Fish solution. On the screen, it shows:
R2′ D R’ U2 R D’ R U2 R’
But, you perform:
R2′ D R’ U2 R D’ R’ U2 R’
The third to the last move is R’ but the screen shows R.
Good catch!
It’s the “Bug Eyes” alg though not “No Fish”: https://youtu.be/fDfpjC-GPBM?t=255
It’s correct in the video description and pinned comment but wrong on the title (which I can’t change). I posted a note about it (in description & pinned comment) when it was brought to my attention when the video was first posted
It was again brought to my attention recently in a YouTube comment.
I am out of coupons for speedcubeshop.com but If I get some more I will send you a $10 coupon for finding the mistake.
Just shoot me a message on my contact page https://www.kevingittemeier.com/contact/
Thank you for this. My son has been asking me to get him a cube so I just picked one up and was able to solve it today because of this. It’s a great day and we have you to thank for it.
Glad it helped!
Hi,
These videos are awesome!!! Emily actually inspired me to do this in the first place. 🙂
However, I am now stuck on forming the yellow cross: I have both the clock hands and horizontal line. I’ve tried the FRUR’U’F algorithm many many times.
Any advice?
Thank you!!!
You have an edge piece incorrectly flipped. The cube likely came apart (dropped?) and was re-assembled incorrectly. Just take apart and reassemble correctly and start over. I was not aware how common this was when I filmed my tutorial and made the post but I will add a note in the post and will note it when I evenly re-film the tutorial incorporating feedback from viewers. In the meantime I may shoot a short film explaining it and showing how to disassemble and reassemble.
Let me know if that was your problem and now works for you.